A Google Sheets conditional dropdown (also called a dependent dropdown) lets you change the options in one dropdown based on the value selected in another. This is one of the most useful data-validation techniques in spreadsheets because it reduces errors, speeds up data entry, and keeps your sheets clean and structured.
In this guide, you’ll learn exactly how conditional dropdowns work in Google Sheets, how to build them step by step, and when to use different approaches depending on your data size and complexity. This article is written for beginners but includes enough depth to help intermediate users avoid common pitfalls.
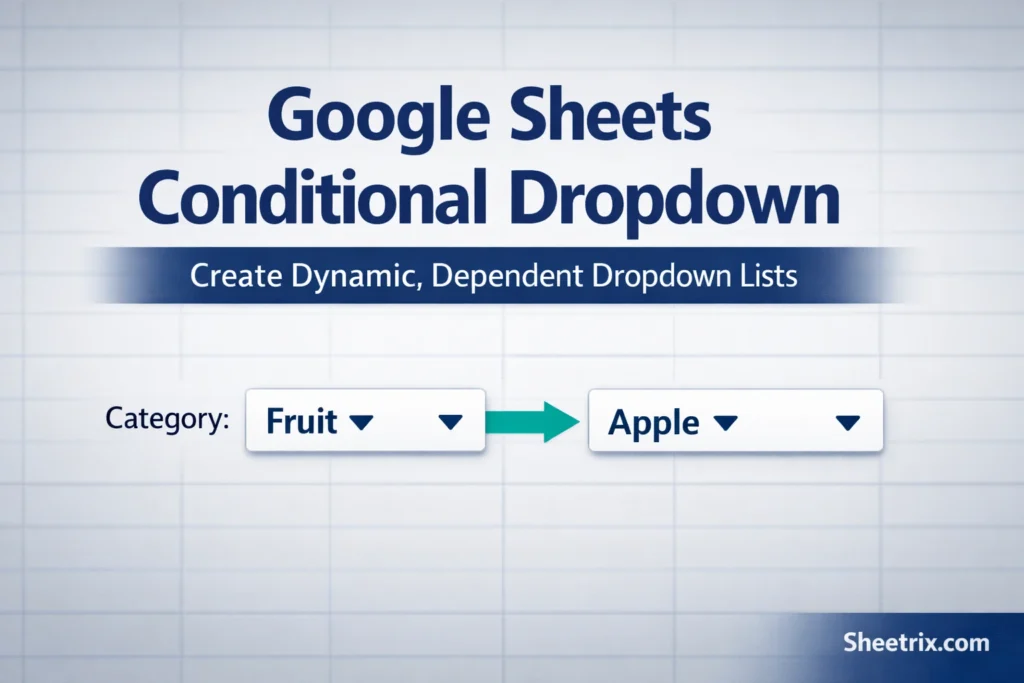
What is a conditional dropdown in Google Sheets?
A conditional dropdown is a dropdown list whose available options depend on another cell’s value. For example:
- Selecting a Category (Fruit, Vegetable, Drink) controls which Items appear in the next dropdown.
- Choosing a Country determines which States or Provinces are selectable.
- Picking a Department limits the Job Titles you can choose.
Instead of one static list, the dropdown updates automatically based on conditions you define.
Why should you use conditional dropdowns instead of static lists?
Static dropdowns are fine for small, fixed lists. Conditional dropdowns become essential when:
- Your list would otherwise be very long and hard to scan.
- You want to prevent invalid combinations (for example, “Apple” under “Vegetables”).
- Multiple people enter data and consistency matters.
- You plan to scale the sheet over time.
From a usability standpoint, conditional dropdowns reduce cognitive load and dramatically lower the chance of incorrect entries.
How do conditional dropdowns work behind the scenes?
Google Sheets does not have a single “conditional dropdown” feature. Instead, conditional dropdowns are created by combining:
- Data validation (to create dropdowns)
- Helper formulas (to filter or reference lists dynamically)
- Structured source data (usually in a separate tab)
Most conditional dropdowns follow this pattern:
- A primary dropdown selects a category or trigger value.
- A formula calculates a list that matches that selection.
- Data validation uses that calculated list as the dropdown source.
Understanding this flow makes troubleshooting much easier.
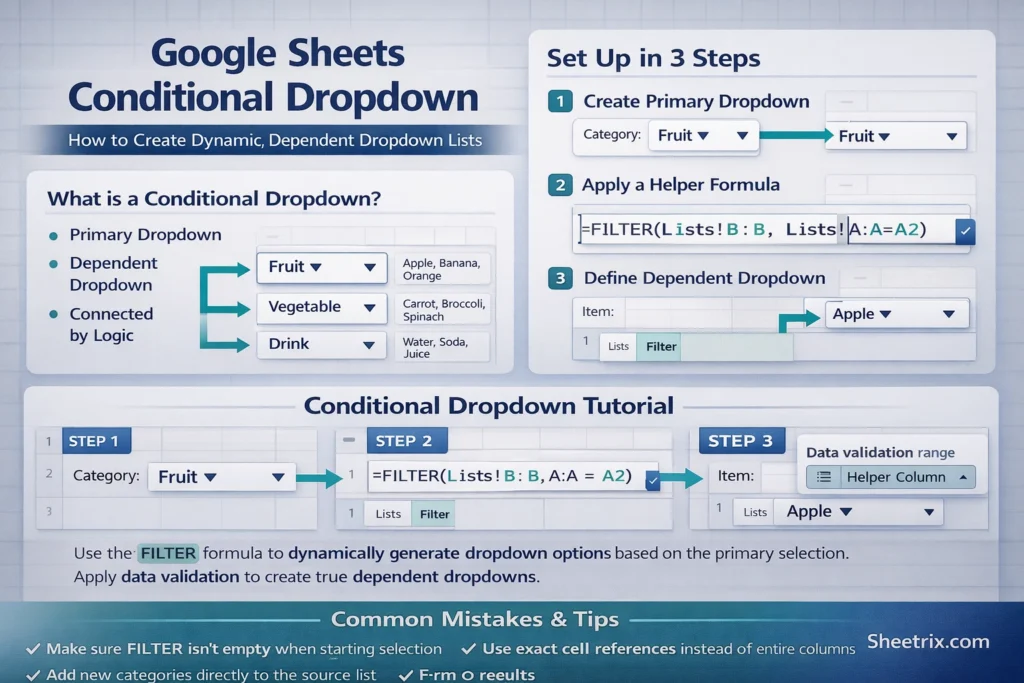
How do you set up a basic conditional dropdown step by step?
Before applying formulas, structure your data correctly. Create a separate sheet (often called “Lists” or “Data”) where your categories and options live.
Example layout:
- Column A: Category
- Column B: Item
Each category should repeat for every related item. This flat structure is more flexible than putting each category in its own column.
Once your source data is ready:
- Create a normal dropdown for the primary category using data validation.
- Use a formula to filter the items that match the selected category.
- Apply data validation to the dependent cell using the filtered range.
This approach works reliably and scales well as your list grows.
FILTER formula examples for conditional dropdowns
The FILTER function is the most common and beginner-friendly way to create a conditional dropdown.
FILTER formula examples
=FILTER(Lists!B:B, Lists!A:A = A2)What this does:
Lists!A:Acontains the categories.Lists!B:Bcontains the items.A2is the cell with the primary dropdown.- The formula returns only items that match the selected category.
You typically place this formula in a helper column (often hidden), then reference that column in data validation.
Why FILTER works well:
- It’s readable and easy to debug.
- It updates instantly when the main dropdown changes.
- It supports partial matches and combined conditions when needed.
Can you create conditional dropdowns without helper columns?
Yes, but with tradeoffs.
You can reference a FILTER formula directly inside data validation by selecting a range that spills results. This keeps the sheet visually clean but has limitations:
- Debugging is harder if something breaks.
- Users may accidentally delete the formula.
- Large datasets can become slower without clear structure.
For shared or client-facing sheets, helper columns are often the safer choice.
How do named ranges compare to FILTER-based dropdowns?
Named ranges are another popular method, especially in older tutorials.
With named ranges:
- Each category has its own named list.
- The dependent dropdown uses INDIRECT to reference the correct name.
While this works, it has downsides:
- Adding new categories requires creating new named ranges.
- INDIRECT is volatile and can slow large sheets.
- Category names must match range names exactly.
For most modern use cases, FILTER-based conditional dropdowns are easier to maintain and scale.
What are common mistakes when building conditional dropdowns?
Several issues come up repeatedly:
- Extra spaces or mismatched text between category values.
- Blank results when no items match the selected category.
- Overwriting helper formulas by pasting values.
- Using entire columns unnecessarily, which can hurt performance in large sheets.
A best practice is to:
- Keep category values consistent (no trailing spaces).
- Wrap FILTER formulas with error handling if needed.
- Limit ranges to realistic sizes instead of full columns when performance matters.
How do conditional dropdowns behave with blank or changed selections?
If the primary dropdown is blank, FILTER returns no results. This can cause the dependent dropdown to show nothing or throw an error.
A simple improvement is to display an empty list until a selection is made, rather than showing incorrect options. This improves UX and prevents accidental data entry.
Another important detail: if a user changes the primary dropdown after selecting a dependent value, Google Sheets does not automatically clear the dependent cell. This means invalid combinations can still exist unless you handle them intentionally.
One advanced technique is to use a script or helper logic to clear dependent cells when the parent value changes—something most tutorials don’t mention.
When should you avoid conditional dropdowns?
Conditional dropdowns are powerful, but not always necessary.
Avoid them when:
- Your list is very small and unlikely to grow.
- Users need to see all options at once for comparison.
- The sheet is primarily for analysis, not data entry.
In these cases, a static dropdown or even free-text entry may be more appropriate.
How can conditional dropdowns support real-world templates?
Conditional dropdowns shine in templates like:
- Expense trackers with category-based subcategories
- Project management sheets with task types per department
- Inventory systems with brand-to-model relationships
- Form-style data entry sheets meant for non-technical users
On Sheetrix, conditional dropdowns are often paired with downloadable templates to help users apply these concepts immediately without building everything from scratch.
Key takeaways for building reliable conditional dropdowns
A Google Sheets conditional dropdown is not a single feature but a pattern. When built correctly, it:
- Improves data accuracy
- Makes sheets easier to use
- Scales cleanly as data grows
The most reliable approach for most users is combining data validation with the FILTER function and well-structured source data. Once you understand that foundation, you can adapt conditional dropdowns to nearly any spreadsheet workflow.