Keeping track of food items, supplies, and daily consumables can quickly become overwhelming—especially if you’re running a restaurant, managing a small food business, or maintaining a busy home kitchen. An effective food inventory system helps prevent waste, avoids last-minute shortages, and saves time during purchasing and prep. This Food Inventory Spreadsheet Template was designed to make that process easier, clearer, and faster for anyone who wants a reliable way to track stock levels.
This template includes a clean, color-coded inventory view and a customizable dropdown settings sheet. Everything updates automatically, making it effortless to see which items need to be reordered, which storage locations are running low, and how much your inventory is worth at any moment. Whether you’re a restaurant owner, meal-prep business, food pantry volunteer, or simply someone who wants a more organized kitchen, this spreadsheet gives you a practical and easy-to-use solution.
Overview of the Template
This Food Inventory Template is built around two simple sheets: the main Inventory sheet where you track all your items, and a support sheet called Dropdowns that powers all the categorized lists. By separating the two, the template stays organized and flexible—users can customize categories, units, storage locations, and item conditions without touching any formulas.
The layout is built to replicate the way real kitchens and food operations track stock. Every row represents an item, and every column provides details such as quantity, minimum quantity, re-order amount, storage area, condition, and more. The template automatically highlights items that need attention, which means you can make decisions before shortages become problems.
One of the strengths of this spreadsheet is its versatility. It works for restaurants with walk-ins and freezers, but it’s also perfect for small bakeries, cafés, food trucks, corporate kitchens, or households. Since everything is customizable, you can adapt it to almost any environment.
Key Features and Sections
This template keeps things simple while still providing all the structure you need to manage inventory effectively. Below is what you’ll find inside.
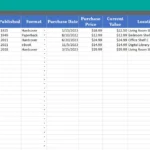
Inventory Sheet
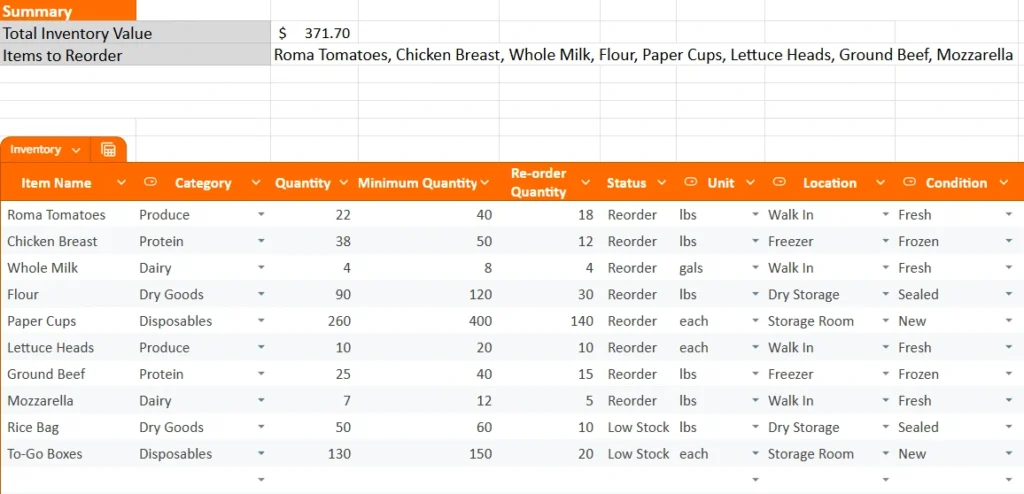
The Inventory sheet is the heart of the template. This is where you log your food items, disposables, dry goods, dairy products, and anything else you keep in storage. Each row contains a complete snapshot of an item, including:
- Item Name – What the product is (e.g., Roma Tomatoes, Chicken Breast, Whole Milk).
- Category – Produce, Protein, Dairy, Dry Goods, or Disposables. These are fully customizable in the Dropdowns sheet.
- Quantity – How many units, pounds, bags, or gallons you currently have on hand.
- Minimum Quantity – The threshold at which you want to reorder.
- Re-order Quantity – How much to order when you fall below your minimum.
- Status – Automatically chosen based on your stock (e.g., Reorder, Low Stock, OK).
- Unit – Pounds, gallons, each, and more.
- Location – Walk In, Freezer, Dry Storage, Storage Room, Fridge, Cabinet, or any other area you use.
- Condition – Fresh, Frozen, Sealed, Opened, or New depending on the type of item.
What makes this layout easy to use is the combination of dropdown menus and consistent structure. For example, you can quickly scroll through your produce and instantly see which vegetables are low for the week, or sort your proteins to confirm what needs to be thawed or reordered.
The visual organization also helps during inventory counts. Whether you’re doing daily checks for a restaurant or weekly checks for a household, all the important information is in one place.
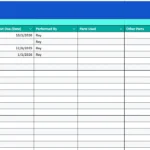
Dropdowns Sheet
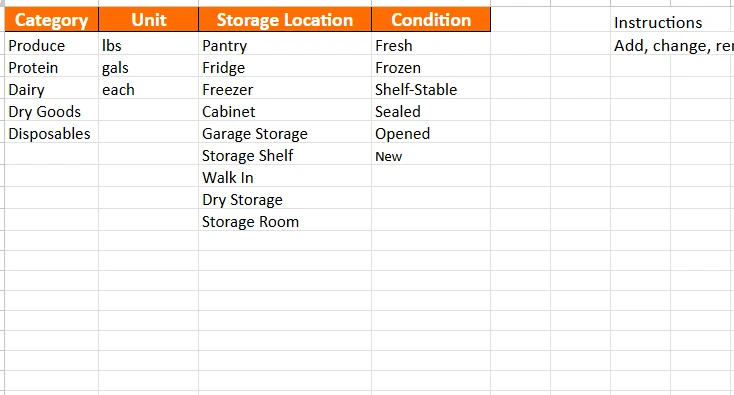
The Dropdowns sheet is what keeps the template flexible and easy to update. It includes four main lists:
- Category
- Unit
- Storage Location
- Condition
You can add, rename, or remove items in these lists, and the changes automatically update your dropdown menus in the Inventory sheet.
For example, if you want to track pantry items in more detail, you could add categories like “Snacks,” “Canned Goods,” or “Baking Supplies.” If your food business uses multiple fridge sections or shelves, you could create more detailed storage location options. The template never restricts you—you can continually adapt it as your operation grows.
There’s also a short instruction note reminding you that editing the list will change the dropdown menus automatically. This makes the template easy for beginners, business owners, or volunteers who may not be familiar with formulas or data validation.
How to Use the Template
Getting started is straightforward. Once you download the template, you can begin customizing it immediately.
Step 1: Set Up Your Categories, Units, and Storage Areas
Before entering items, open the Dropdowns sheet. Add any categories or units you use in your kitchen. If your operation has multiple fridges, freezers, or specialty areas, list them here so they appear in your dropdown menus.
A few examples of common setups include:
- Home kitchens adding “Pantry,” “Snack Drawer,” “Fridge Left Shelf,” or “Baking Cabinet.”
- Restaurants listing “Walk In,” “Walk In 2,” “Prep Fridge,” “Dry Storage Aisle 2,” or “Freezer Line.”
- Bakeries using “Dry Storage,” “Cooling Rack,” or “Baking Fridge.”
Go to the Inventory sheet and begin logging your items one by one:
- Enter quantity based on your current stock.
- Set minimum quantities depending on how much you typically need on hand.
- Add a re-order quantity that matches your purchasing habits.
- Choose the appropriate unit, storage location, and condition.
For example, if you buy flour in 50-lb bags and you always want at least 120 lbs in storage, you might enter:
- Quantity: 90
- Minimum Quantity: 120
- Re-order Quantity: 30
- Status: Reorder
As soon as your quantity dips below your minimum, the item will appear in your “Items to Reorder” summary.
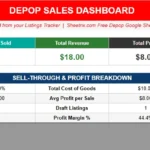
Step 3: Use the Summary to Make Decisions
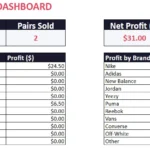
At the top of the sheet, you’ll see your:
- Total Inventory Value – Based on your cost-per-unit entries.
- Items to Reorder – Automatically lists items that require action.
This summary section helps you plan purchasing efficiently. Many restaurants check this before submitting daily or weekly supplier orders. Home users might check it before grocery runs to avoid buying duplicates or forgetting essentials.
Step 4: Keep the Template Updated
The more consistently you update the spreadsheet, the more valuable it becomes. Here are a few routines that work well:
- Daily checks for restaurants with high turnover.
- Weekly checks for meal-prep businesses or food pantries.
- Biweekly or monthly checks for households.
Even five minutes of updating can save hours of tracking later.
Why Choose This Template
There are many ways to manage food inventory, but most systems are either too complicated or too basic. This template strikes a balance: simple enough for beginners, but detailed enough for professional use.
Here are a few reasons users love it:
- Clear, organized structure – Everything is in one clean layout without clutter.
- Customizable dropdowns – Tailor it to your exact kitchen setup.
- Automated reorder tracking – No more guessing when supplies are low.
- Easy sorting and filtering – Quickly view items by category, condition, or storage area.
- Perfect for multiple environments – Works for homes, restaurants, cafés, bakeries, food pantries, and more.
- Beginner-friendly – You don’t need formulas or advanced spreadsheet knowledge.
- Consistent and reliable – Helps reduce food waste, prevent shortages, and improve budgeting.
Users who manage food regularly appreciate tools that don’t slow them down. This template is built to support real workflows, not complicate them.
Get Your Free Food Inventory Spreadsheet
- Free Template
- Fully Editable
- Instant Access
- Organize your information
How to Access Your Copy
- Enter your email for instant access
- Open the link we send you
- Start using the spreadsheet right away