Planning meals during a vacation or road trip can quickly become overwhelming—especially when you’re trying to balance budgets, dietary needs, grocery runs, and the limited storage space that comes with traveling. That’s exactly why this trip meal planning spreadsheet exists. It’s a simple, customizable Google Sheets template that helps you map out meals day-by-day, track ingredients, and stay organized whether you’re traveling solo or coordinating meals for a family or group.
This template is easy to understand, beginner-friendly, and flexible enough to work for camping trips, Airbnb vacations, long road trips, or even travel tournaments where meals need to be planned ahead of time. Below, you’ll find a complete walkthrough of how the spreadsheet works, how each sheet is structured, and practical examples to help you get the most out of it.
Overview of the Template
This trip meal planning spreadsheet was designed to simplify every part of planning food for a multi-day trip. Instead of juggling handwritten notes, grocery store receipts, and random recipe links, everything lives in one organized workbook. It includes:
- A Trip Plan sheet where you can map out meals for each day using drop-down menus
- A Meals & Ingredients sheet where you can store meals, recipes, and all required ingredients
- An optional place to add more meals as needed, whether simple items like “Granola Bar” or full dishes like “Chicken Adobo”
The heart of this spreadsheet is the drop-down functionality. Once you enter meals in the ingredients sheet, they automatically appear as options in the daily planner. This makes it easy to build out your trip menu in minutes while still giving you full control over the ingredients list.
Whether you’re someone who likes to plan every detail or just needs a rough idea of what food to pack, this structure works for all planning styles.
Key Features and Sections
Trip Meal Plan Sheet
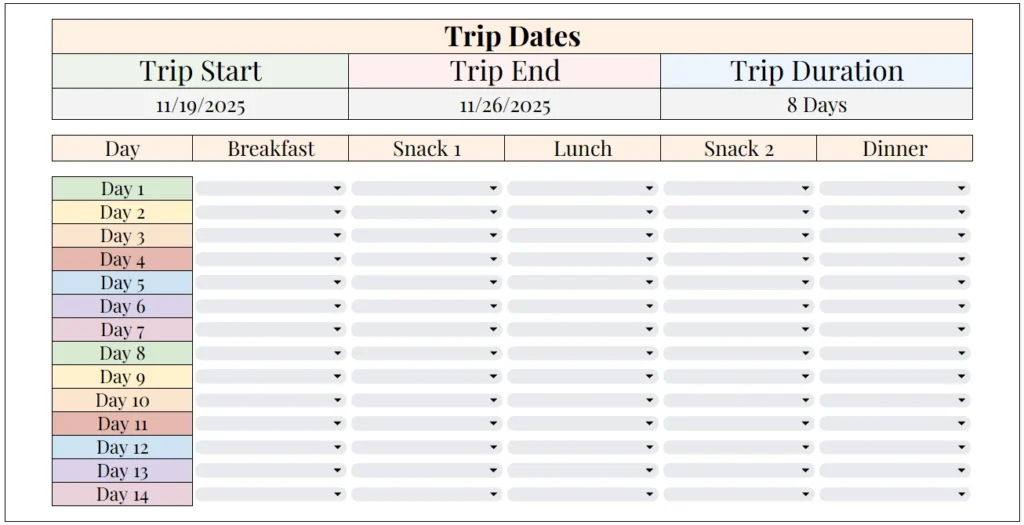
The Trip Meal Plan sheet is the main planning dashboard. At the top, you’ll find three key boxes:
- Trip Start – the first day of your trip
- Trip End – the final day
- Trip Duration – automatically calculates your total number of days
Below the trip date section is a clean, easy-to-read layout showing Day 1 through Day 14, each with its own row. You can adjust the number of days depending on the length of your trip, but 14 provides a generous starting point.
Each row includes drop-down menus for:
- Breakfast
- Snack 1
- Lunch
- Snack 2
- Dinner
The soft-colored day labels make it easy to visually follow the trip timeline, while the drop-down menus reduce typing and help keep entries consistent. Because the meals are pulled directly from the meals list, you can plan out your entire trip menu without retyping meal names or worrying about spelling variations.
This is especially useful for group trips where multiple people may be helping with planning. Everyone sees the same structure and the same options, which minimizes confusion.
Meals & Ingredients Sheet
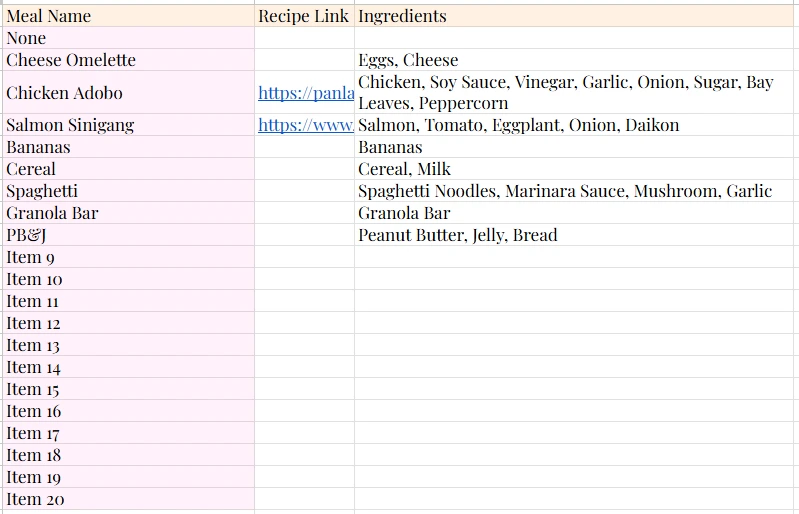
The Meals & Ingredients sheet is where you store every meal you want available in the planner. This is one of the most valuable parts of the template because it keeps your ingredients list organized and ensures you don’t forget items when packing or shopping.
The sheet includes three columns:
- Meal Name – the name that appears in the drop-down menus
- Recipe Link – optional links to online recipes
- Ingredients – all ingredients required for that meal
The template already includes several sample entries such as:
- Cheese Omelette
- Chicken Adobo
- Salmon Sinigang
- Cereal
- Spaghetti
- PB&J
- Granola Bar
These examples show the full range of possible meals—from simple snacks to full dishes with recipes.
If you prefer cooking from scratch during your trip, you can add recipes like stir-fry, curry, tacos, or stews. If your goal is quick and easy meals, you might add items like instant noodles, sandwiches, fruit cups, or pre-made wraps. The list is fully customizable, so you can tailor it to your travel style, budget, and dietary needs.
This sheet also takes care of ingredient tracking. When you list ingredients for each meal—for example, “Chicken, Soy Sauce, Vinegar, Garlic, Onion, Sugar, Bay Leaves, Peppercorn”—you later have a clear view of everything you need to buy or bring. It’s one of the easiest ways to avoid forgotten items or duplicate purchases.
How to Use the Template
This template is designed to be quick to set up, even if you’re not familiar with spreadsheets. Below is a straightforward guide for getting started.
Step 1: Enter Your Trip Dates
Start on the Trip Meal Plan sheet and enter your trip start and end dates. The spreadsheet will automatically calculate the total duration. For example:
- Trip Start: 11/19/2025
- Trip End: 11/26/2025
- Trip Duration: 8 Days
This helps you plan meals with a clear timeline in mind.
Step 2: Add or Edit Meals in the Meals & Ingredients Sheet
Go to the Meals & Ingredients sheet and list out everything you plan to offer as meal choices. You can:
- Keep the sample meals
- Replace them with your own
- Add up to 20 or more additional items
For example, if you’re camping, you might add:
- Hot Dogs
- Grilled Veggies
- Campfire Chili
- Instant Oatmeal
- S’mores Kits
If you’re staying in an Airbnb with a kitchen, you might add meals like:
- Pancakes
- Chicken Stir Fry
- Tuna Sandwiches
- Sheet-Pan Vegetables
- Baked Pasta
The more detail you add here, the easier planning becomes later.
Step 3: Plan Meals Using the Drop-Downs
Return to the Trip Meal Plan sheet. Now you can select meals for each day simply by clicking the drop-down arrows. For example:
- Day 1
- Breakfast: Cereal
- Snack 1: Granola Bar
- Lunch: Chicken Adobo
- Snack 2: Bananas
- Dinner: Salmon Sinigang
This approach keeps your trip organized and ensures you plan food according to your schedule, your storage capacity, and the activities planned for each day.
Step 4: Use the Ingredients List to Shop or Pack
Once your meals are set, scroll through the Ingredients column in the Meals sheet. This gives you a full overview of what you’ll need.
Some travelers like to copy all ingredients into a grocery list or consolidate items (e.g., combining all “Garlic” entries across meals). Others simply reference the sheet as they pack or shop. The template works well either way.
Why Choose This Template
This trip meal planning spreadsheet was created for real travelers who want a simple, visually clear, and functional way to organize meals on the go. It is especially helpful for:
- Families traveling with kids who need structured meals
- Campers who must pack ingredients ahead of time
- Road-trippers with limited cooler or trunk space
- Airbnb vacationers who want to avoid overspending on restaurants
- Group trips where multiple people contribute meals
- Sports teams or tournaments where meals have to be organized over multiple days
The template is intentionally minimalist with soft colors, large headings, and intuitively formatted tables. It avoids the clutter of more complicated meal planners while still offering essential structure.
Because the spreadsheet is built in Google Sheets, you can use it:
- On desktop
- On your phone
- Offline (with Google Sheets offline mode)
- While sharing it with others
It is fully editable, easy to customize, and can be reused for future trips by simply clearing the drop-downs.
If you want to save time, reduce stress, and keep meals organized during your next trip, this template provides everything you need in one place
Get Your Free Trip Meal Planning Spreadsheet
- Free Template
- Fully Editable
- Instant Access
- Organize your information
How to Access Your Copy
- Enter your email for instant access
- Open the link we send you
- Start using the spreadsheet right away